Getting started with Camunda
Florent Lefort11 min read
When aiming to deploy an application with a workflow, it’s crucial to have tools to track and manage the objects that flow through it. This is where Camunda comes into play – a tool specifically designed for this task. In this article, the focus will be on delving into the detailed functionalities offered by Camunda and how it streamlines work through effective business process management.
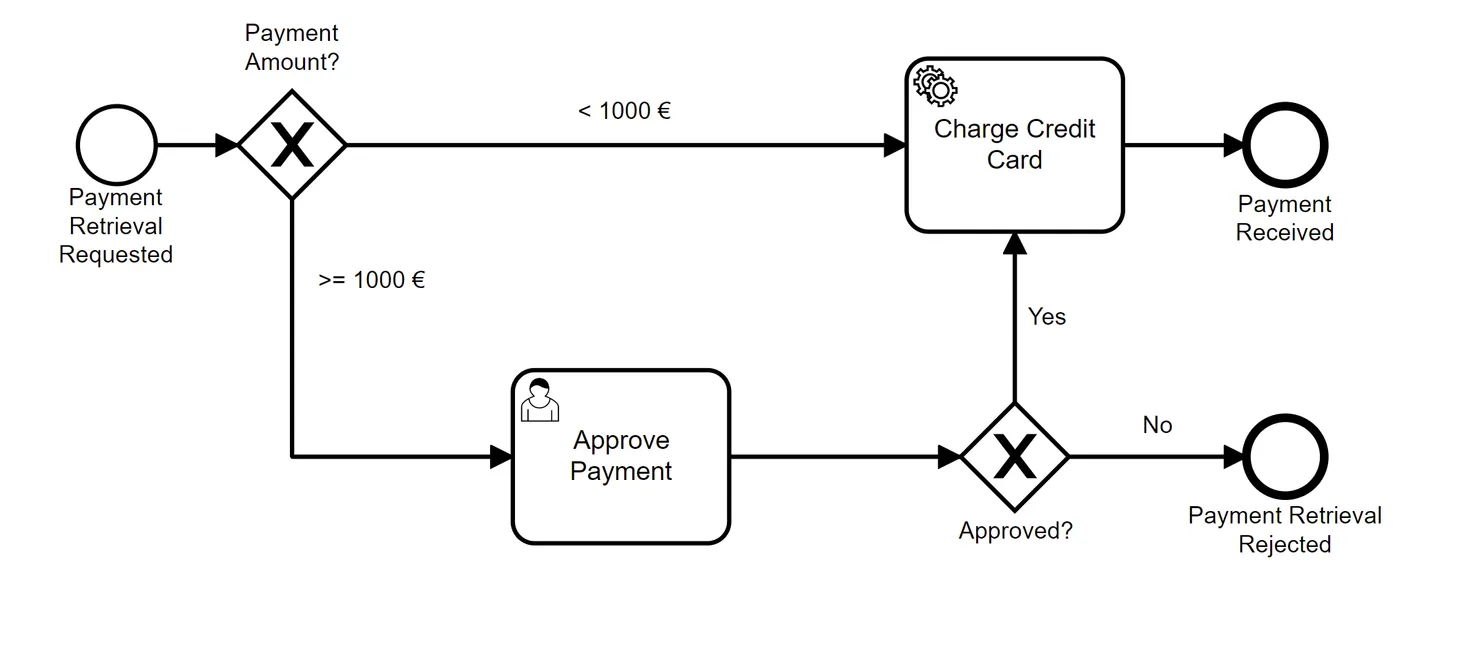
Camunda functions as an orchestrator, providing a set of tools and services for modeling, executing, and monitoring business processes. Within the context of this article, the example used involves the processing of payment transactions using a card. When the transaction amount exceeds €1000, approval from a person becomes necessary for the transaction; otherwise, the amount is deducted immediately. The following BPMN (Business Process Model and Notation) diagram illustrates this scenario:
In this article, I will provide you with detailed insights into how to:
- Visualize the state of instances in production
- Manage our flow
- Evolve Camunda processes
- Understand errors
The Camunda version used in this article is the Camunda Platform 7.15.0
Some Camunda Vocabulary
BPMN represents our Process, which consists of a series of activities (see the first image).
An Activity is an action performed by code (e.g., Charge Credit Card), a person (e.g., Approve Payment), or a called subprocess.
The execution of this process on a per-unit basis is called an Instance.
Gaining Business Flow Insight: Visualizing Instances in Camunda Cockpit
When the process is used in production, there can be multiple payments happening concurrently, each at a different step within our process. Consequently, one might want to access the status and the activity each payments is currently in. For this purpose, the Camunda cockpit comes into play. It serves as the control tower for our instances, enabling us to know the state of all instances and their progress in the process.
As depicted in the following figure, the cockpit allows you to:
- Access the BPMN diagram representing your Process (1): this is your business process.
- See the version of your Process (2): multiple versions can coexist. With each new deployment, a new version of your BPMN becomes available; the old versions are not deleted.
- Observe the number of instances in the currently visible process version, as well as the total instances across different process versions (3).
- Locate instances within the process and their state. Blue badges indicate the number of instances on an activity, while red ones indicate instances encountering errors within the activity (4).
- Obtain details about various instances, such as their ID or start date (5).
- By clicking on an instance’s ID, you can access more information about that instance, including internal Camunda variables (6).
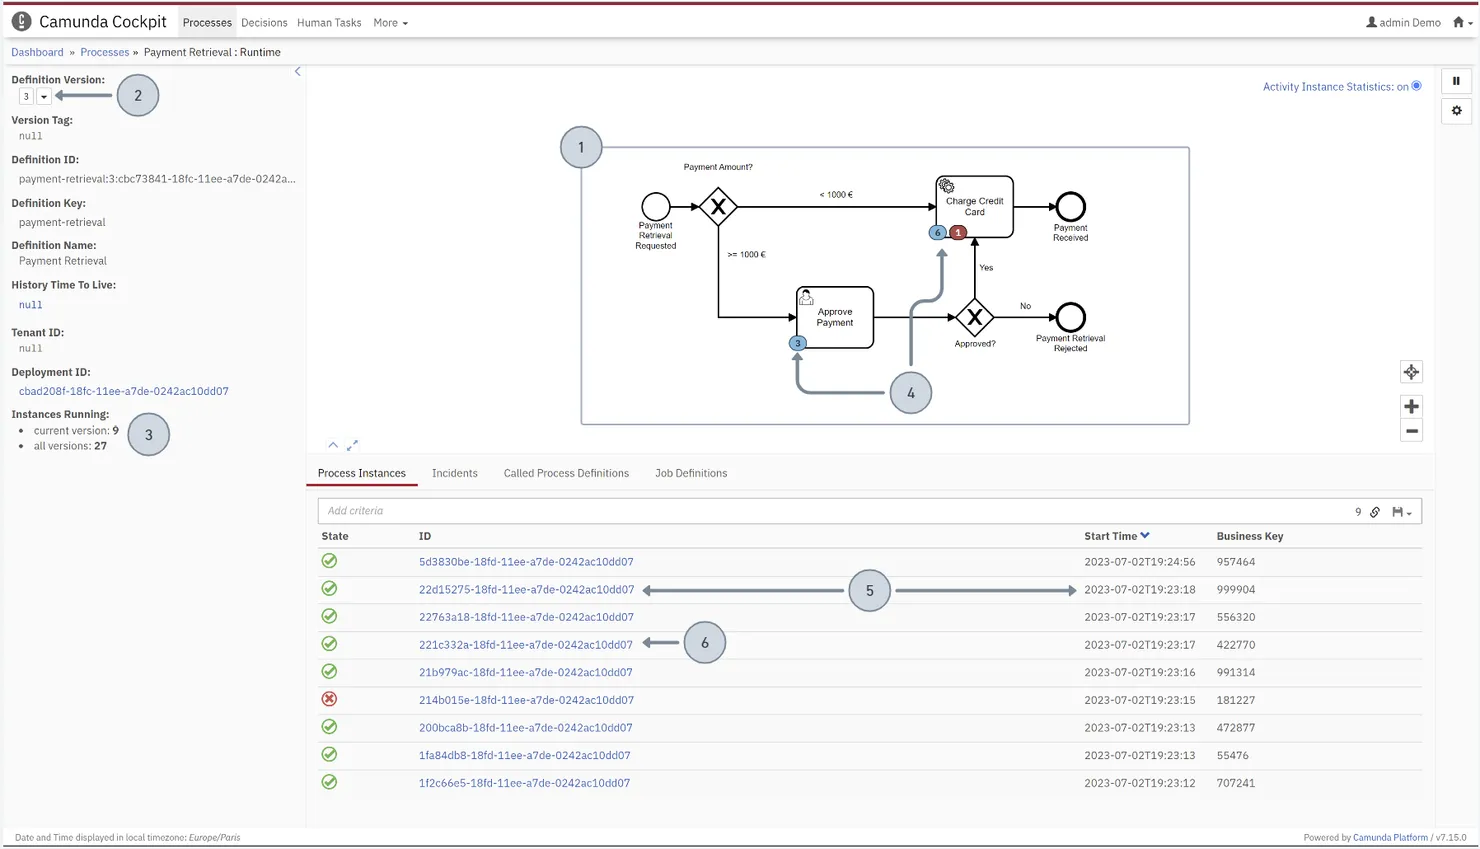
In this example, the current process is in version 3, with a total of 9 instances. Across different versions, there are a total of 27 instances. Within version 3, 3 instances are currently at the “approve payment” step, and 6 are at the “charge credit card” step, with one encountering an error (further details will be discussed below).
Managing Our Flow: Handling Camunda Instances
A payment needs to be initiated within our process and then processed automatically or manually, regardless of its state or progress in our process, to ensure it reaches the end of the process.
Creating an Instance in the Flow
To make a payment, a new instance must be created and guided through our process. This instance requires variables, such as the price and name of the purchased item. To accomplish this, Camunda’s REST API will be utilized. Therefore, the first route I wanted to introduce is the POST /process-definition/key/{key}/start route. The key corresponds to the ID of your process. An ID is automatically generated during the creation of the BPMN, but you can modify it to be more descriptive of your process’s purpose. You can find this ID in your BPMN.
<bpmn:process id="payment-retrieval" name="Payment Retrieval" isExecutable="true">
By default, your instance will start in the latest version of your Process.
Additional information can be included in the body of the request:
- The business key, which can be used to identify your payment. Note that there’s no uniqueness constraint on this variable in Camunda.
- Camunda variables that will be used in your process.
- The activity where you want to begin. If nothing is specified, the instance will start at the startEvent.
Example of a body to start an instance in our case:
{
  "businessKey": "1",
  "variables": {
    "amount": {
      "type": "integer",
      "value": "500",
      "valueInfo": {}
    },
    "item": {
      "type": "String",
      "value": "PS5",
      "valueInfo": {}
    }
  },
  "startInstructions": [
    {
      "type": "startBeforeActivity",
      "activityId": "StartEvent_1"
    }
  ]
}
You can find more information about creating an instance in the Camunda API REST documentation.
Another Highly Useful Route: Moving Instances in the Flow
Ideally, instances should progress through the flow without the need for manual movement. However, in some cases, understanding how to move an instance can be beneficial. For example, if the provided price was incorrect, it might be necessary to transfer the instance from the upper branch of the process to the lower one.
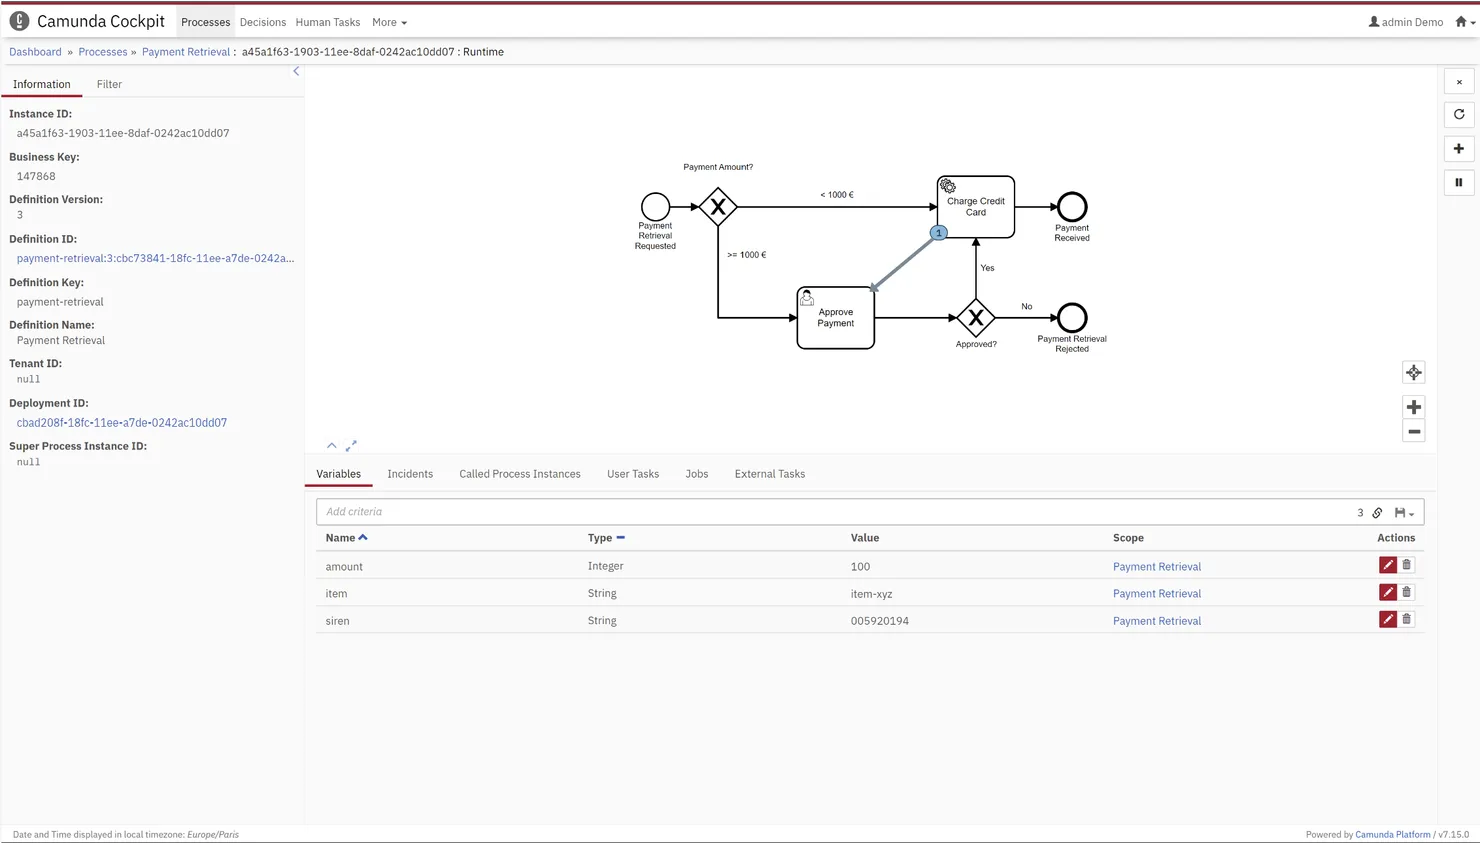
Another potential scenario involves introducing a bug in one of the activities. If the role of the activity is to set a variable, it could be improperly configured. After resolving the bug, the instance needs to be passed back through the activity to set the correct value this time.
To move an instance, the route POST /process-instance/{instanceId}/modification can be used, where ‘instanceId’ represents the identifier of the instance to be modified.
In the request’s body, specific information is required, comprising a series of instructions. These instructions consistently consist of two components: a “type” field with potential values such as cancel, startBeforeActivity, or startAfterActivity. If “cancel” is selected, it’s essential to specify the instance to cancel using the “activityInstanceId” field. Conversely, if a different option is chosen, the identifier of the activity to start must be provided using the “activityId” field. Importantly, opting to initiate a new instance without canceling the previous one will result in the duplication of the instance, causing it to exist in two activities simultaneously.
Example of moving an instance:
A POST request is performed on this URL: /process-instance/a45a1f63-1903-11ee-8daf-0242ac10dd07/modification, with the following body:
{
  "instructions": [
    {
      "type": "cancel",
      "activityInstanceId": "a45a1f63-1903-11ee-8daf-0242ac10dd07"
    },
    {
      "type": "startBeforeActivity",
      "activityId": "Task_ApprovePayment"
    }
  ]
}
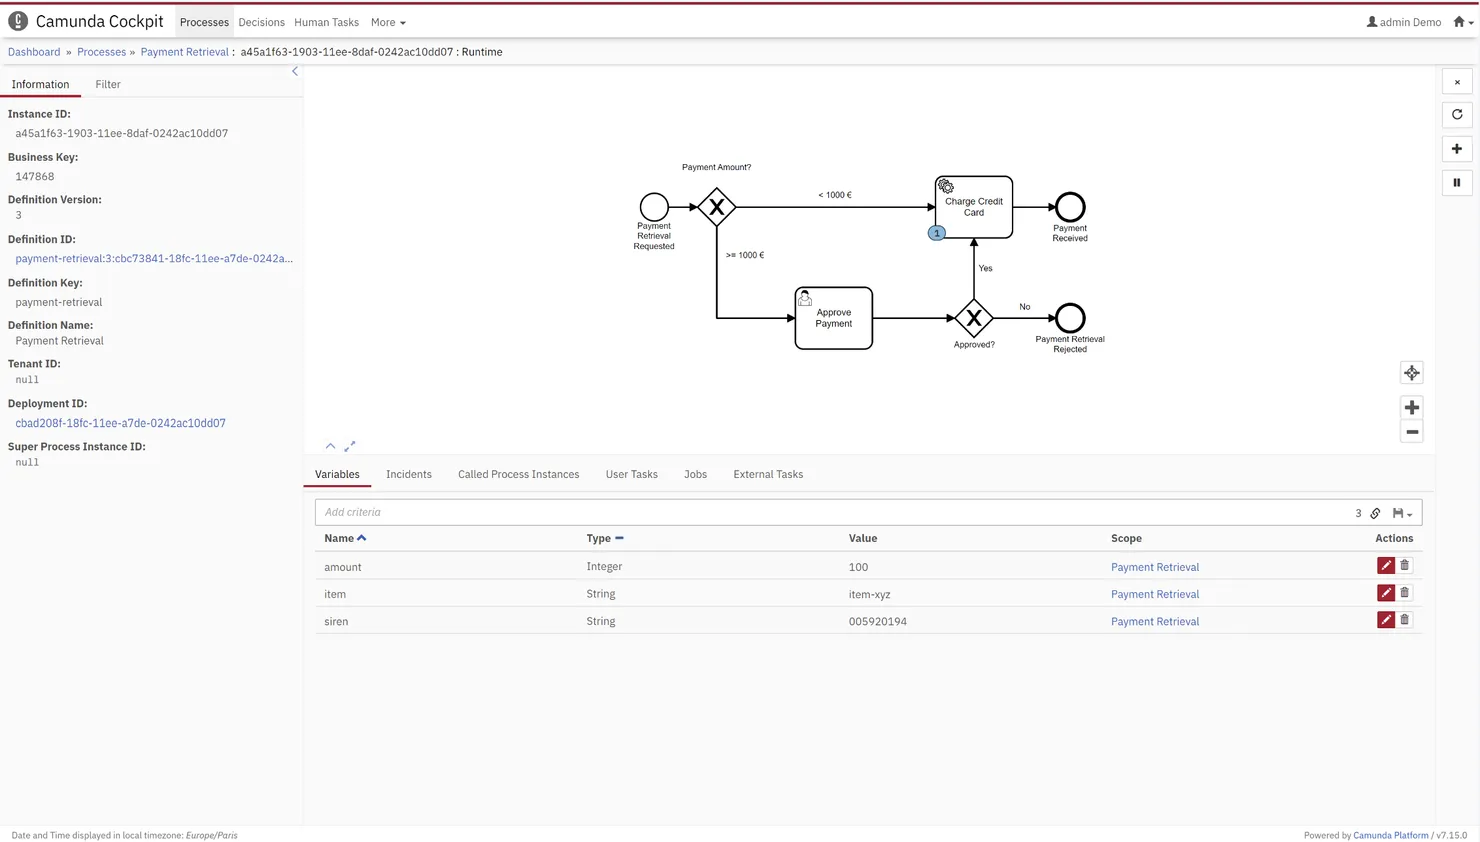
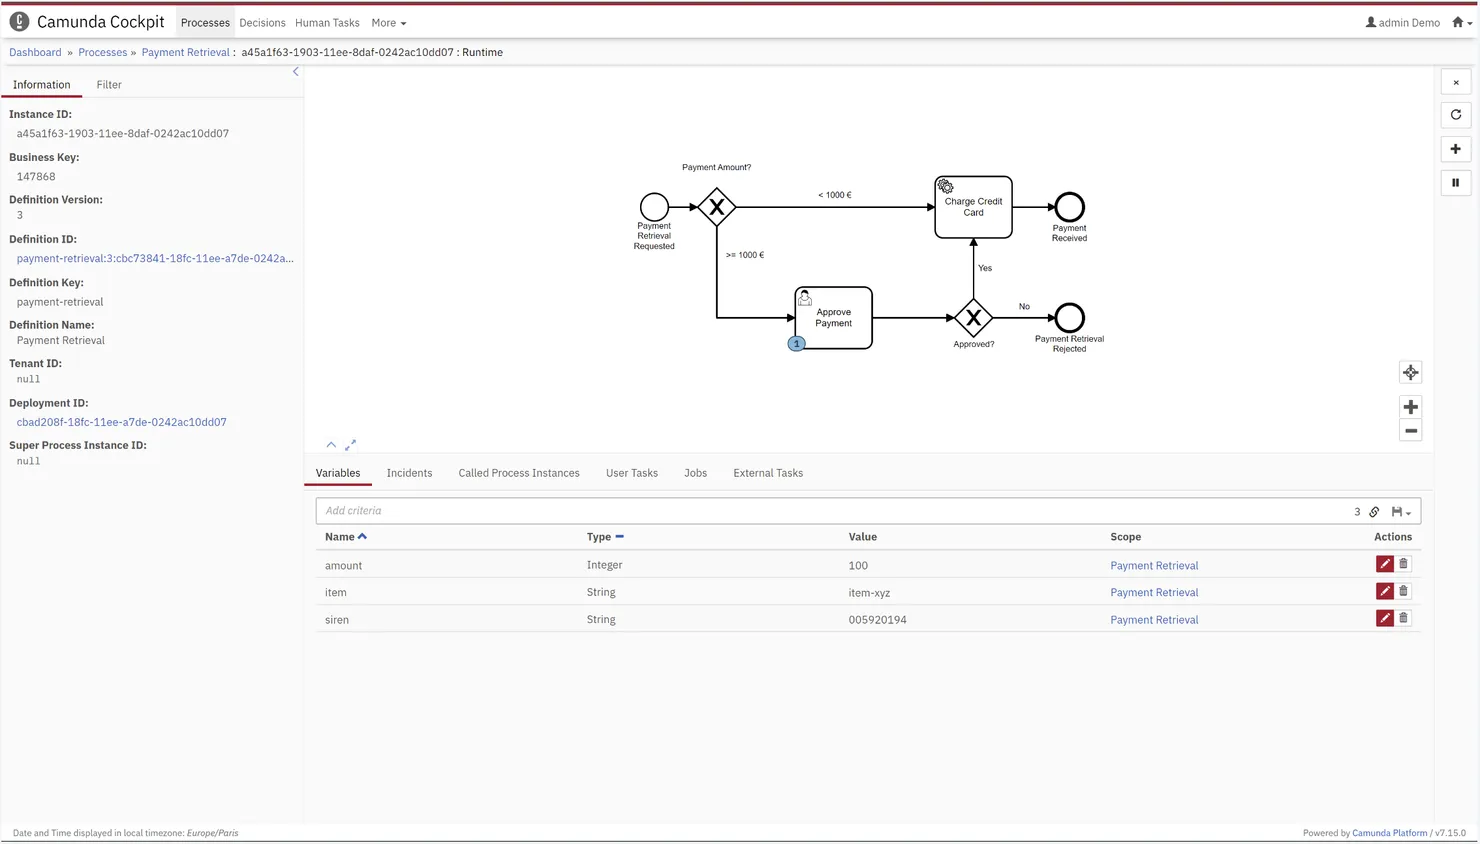
This body executes exactly the scenario depicted in the previous image.
Before executing the request, the system is in this state:
After executing the request, the system is in this state:
You can find more information about modifying an instance in the Camunda API REST documentation.
Retrying Instances in Case of Errors
It can be useful to be able to retry an instance from where it stopped due to various reasons. For example, when trying to debit the transaction amount from the card and the service relied upon is temporarily unavailable, the instance should encounter a failure, permitting a subsequent retry once the service is operational again. In our case, there are two available solutions.
One option is to do it directly from the cockpit. By choosing the relevant instance, the “Retry” button on the right-hand side can be clicked. In case the instance is in an incident state, navigating to the “Incident” tab and clicking the “Retry” button there is another approach.
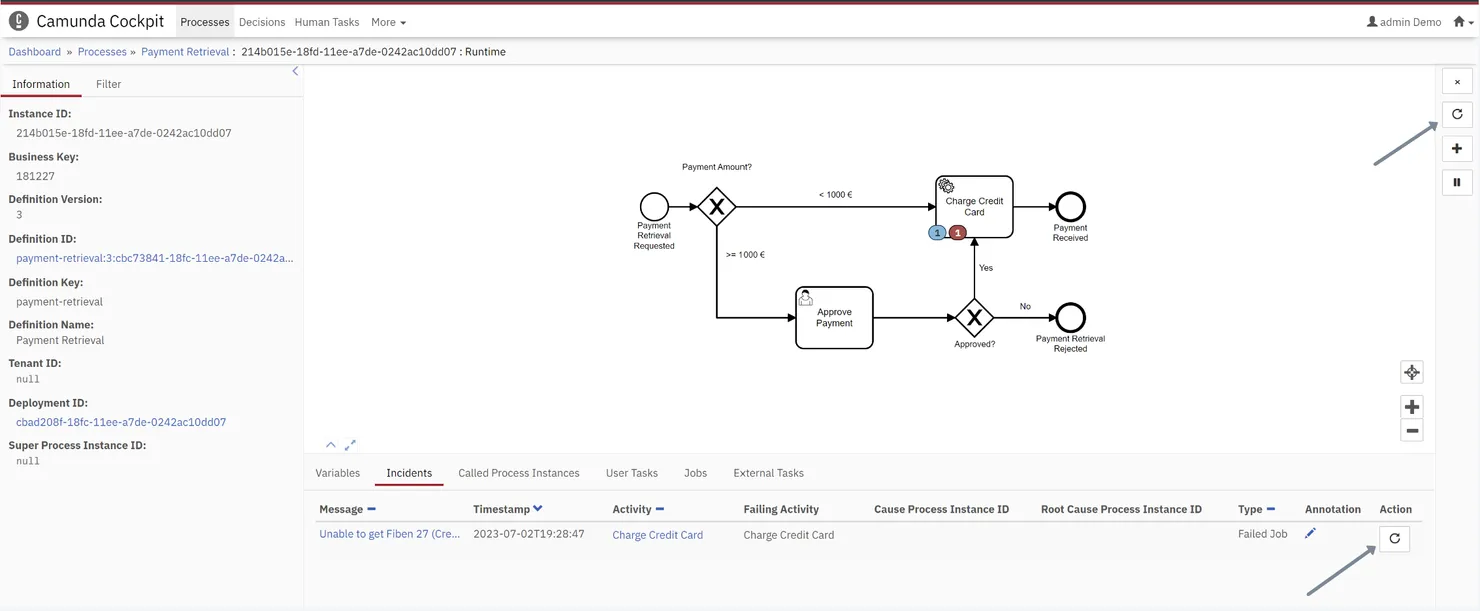
The second option involves using the previously mentioned route for moving an instance. By specifying the activity where the instance is situated using a startActivity instruction, it enables us to retry it. This method can be very useful if you need to retry a large number of instances.
Stopping a Process
If a person who initiated an instance wishes to cancel it, knowing how to stop it within the flow is essential. Two options are at our disposal for this purpose.
One option is to interrupt it directly from the cockpit by selecting our instance and clicking the instance deletion button.
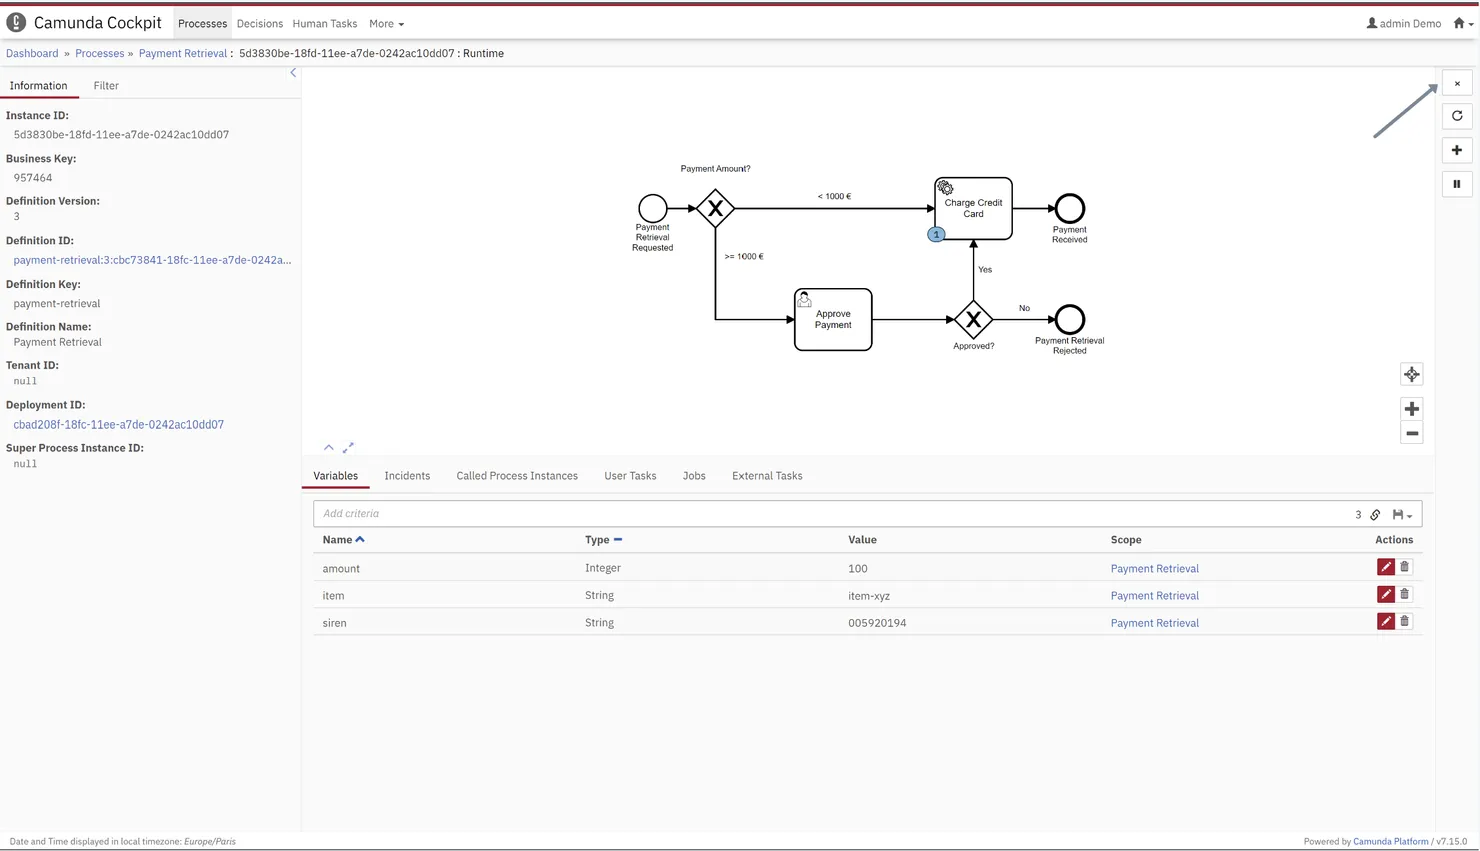
Alternatively, the route DELETE /process-instance/{instanceId} can be employed, where ‘instanceId’ represents the identifier of the instance to be deleted.
For example, let’s do this for the instance in the previous diagram. I would call the route /process-instance/5d3830be-18fd-11ee-a7de-0242ac10dd07.
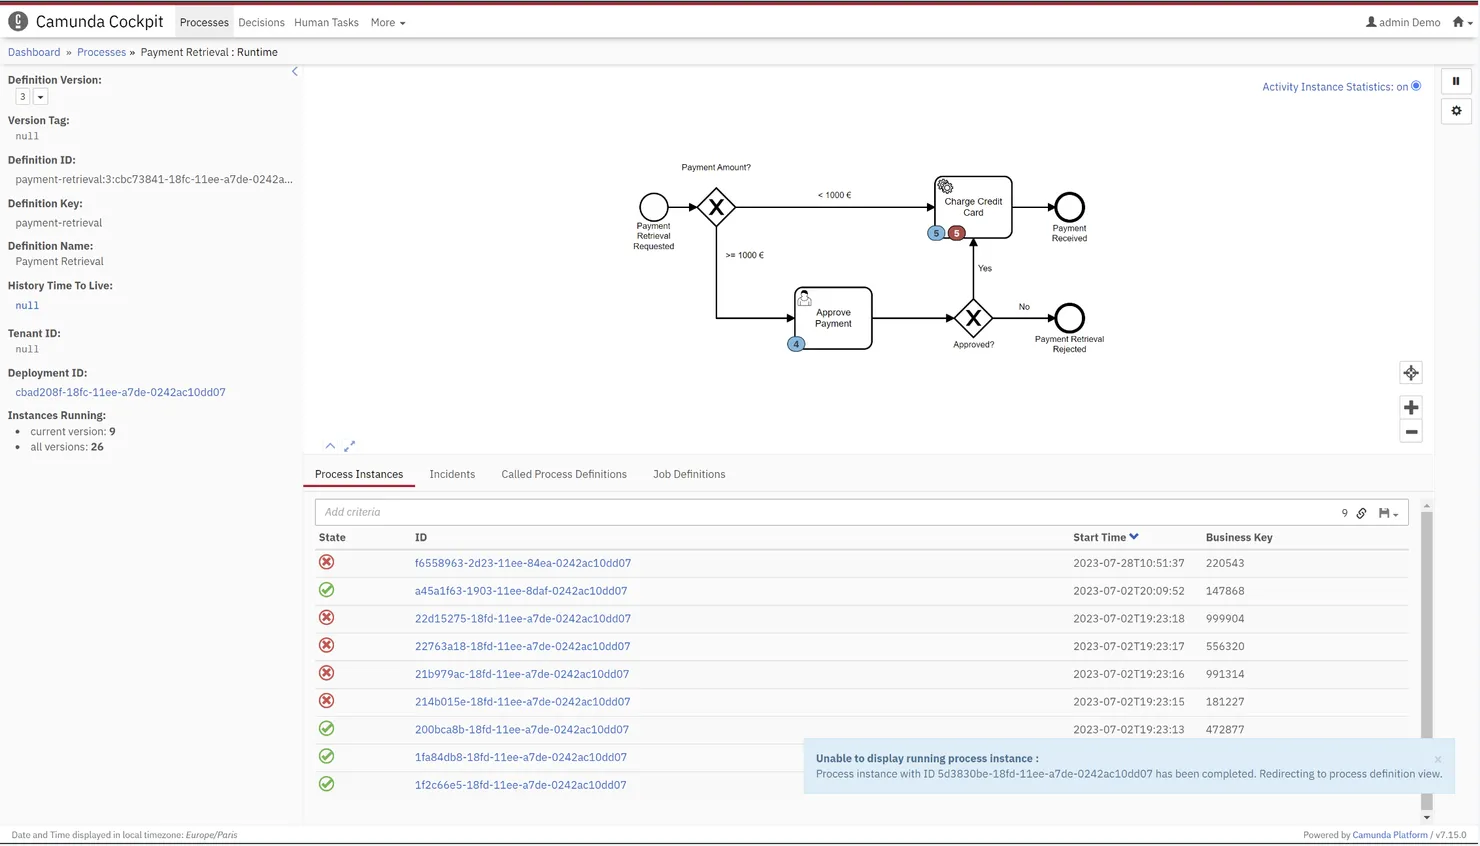
As you can see in the image, the instance has been successfully removed from Camunda.
You can find more information about deleting an instance in the Camunda API REST documentation.
Modifying Internal Camunda Variables
When performing a migration (eg: an upgrade of process version), there might be a need to change the format of certain variables due to a breaking change, or when a bug arises, it might be necessary to modify a variable element in Camunda.
Once again, two options are available:
Option 1:
You can go through the cockpit by selecting the instance for which you want to modify the variables, and then clicking on the ‘Variables’ tab. From this page, you can modify your variables.
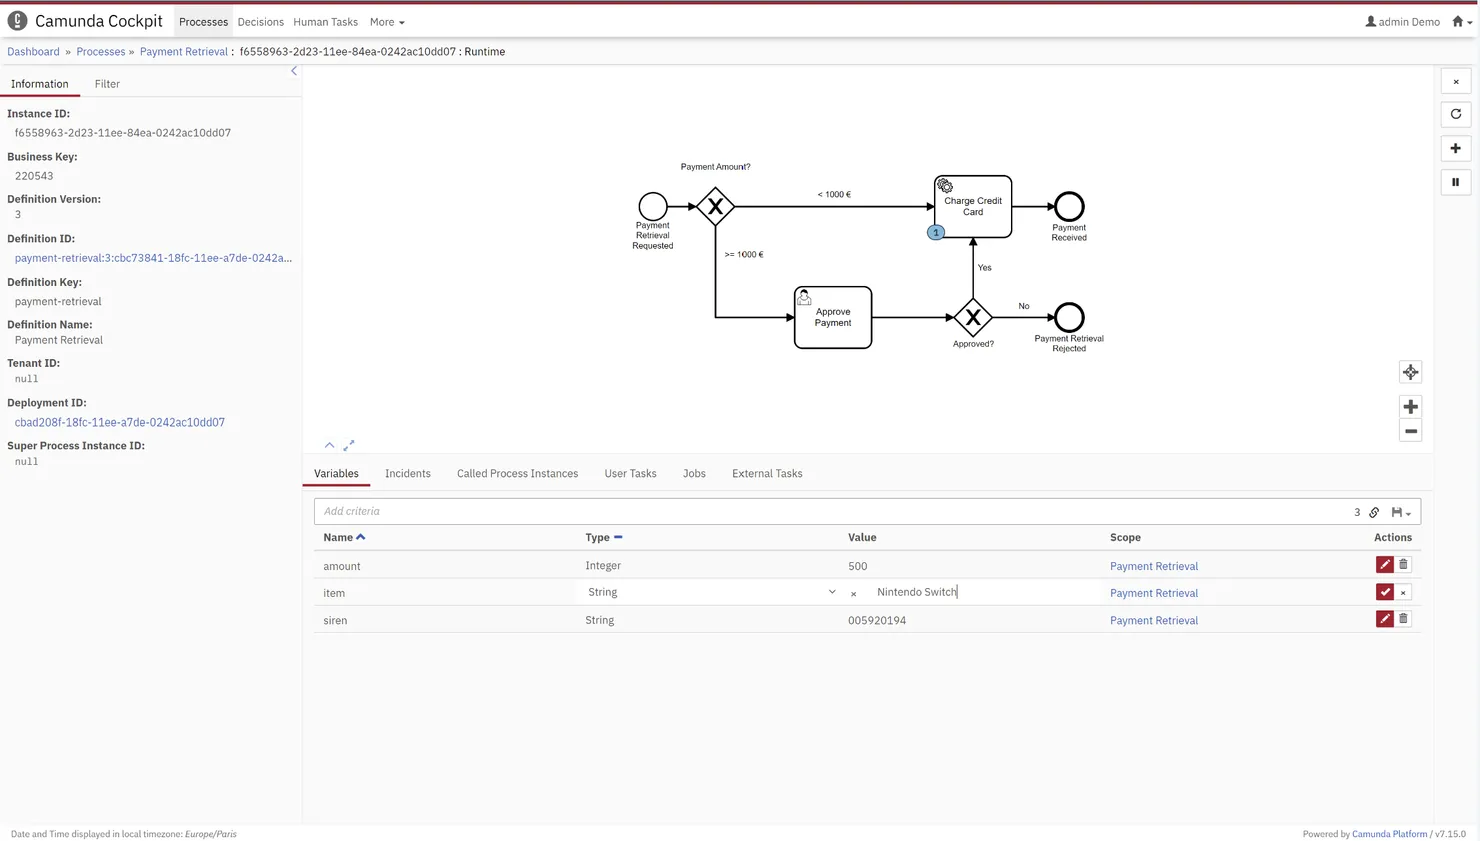
Option 2:
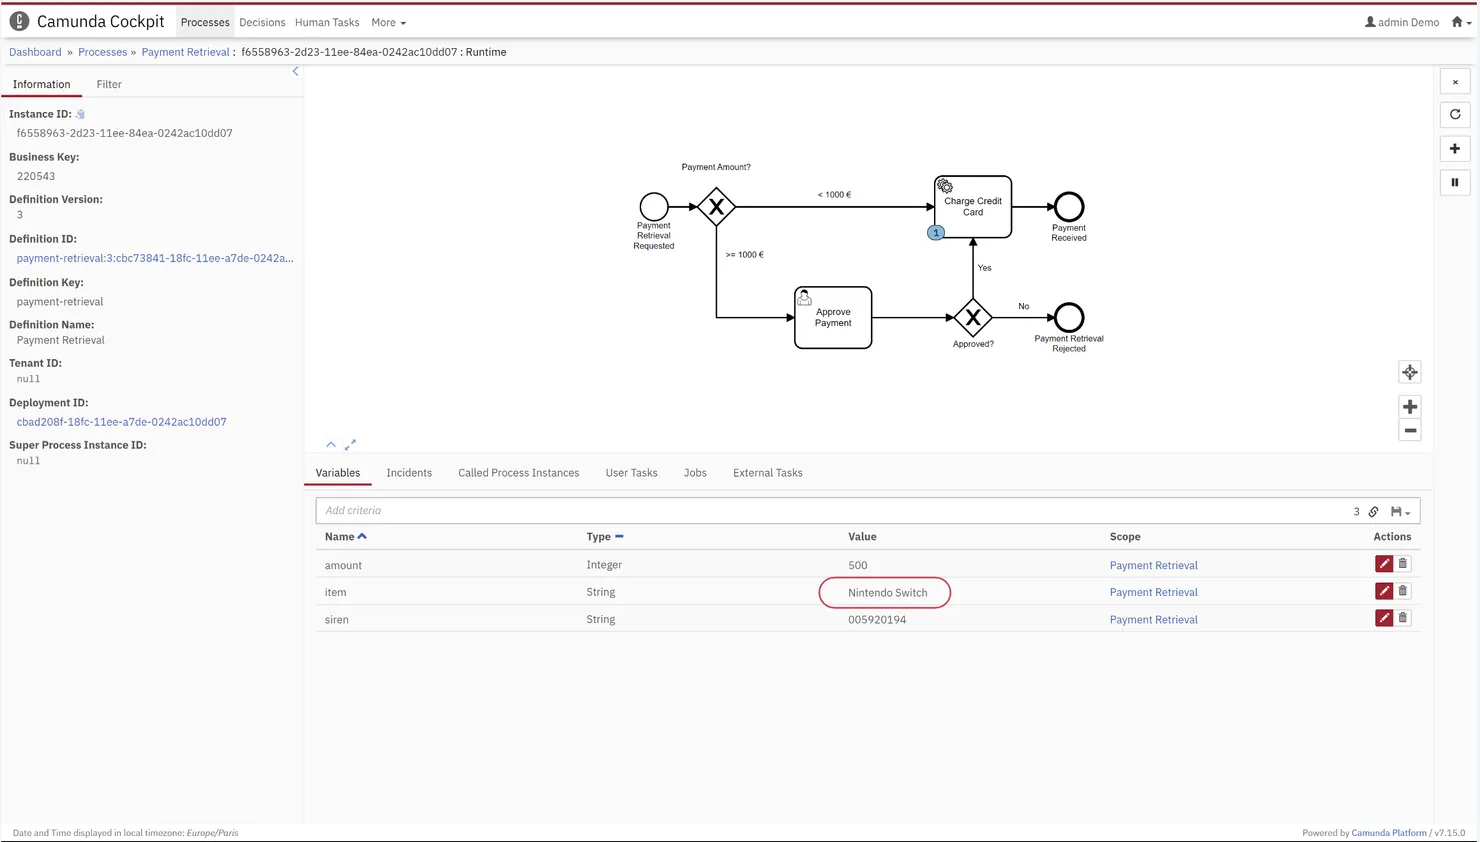
The second option involves utilizing the modification route previously mentioned. In this case, you can retry the instance at its current step or move it while simultaneously modifying one or more variables, as shown in the example below with this POST request: /process-instance/f6558963-2d23-11ee-84ea-0242ac10dd07/modification.
{
  "skipCustomListeners": true,
  "skipIoMappings": true,
  "instructions": [
    {
      "type": "cancel",
      "activityInstanceId": "f6558963-2d23-11ee-84ea-0242ac10dd07"
    },
    {
      "type": "startBeforeActivity",
      "activityId": "Task_ChargeCreditCard",
      "variables": {
        "item": {
          "type": "String",
          "value": "Nintendo Switch",
          "valueInfo": {}
        }
      }
    }
  ]
}
Before executing this request, the item is a PS5.
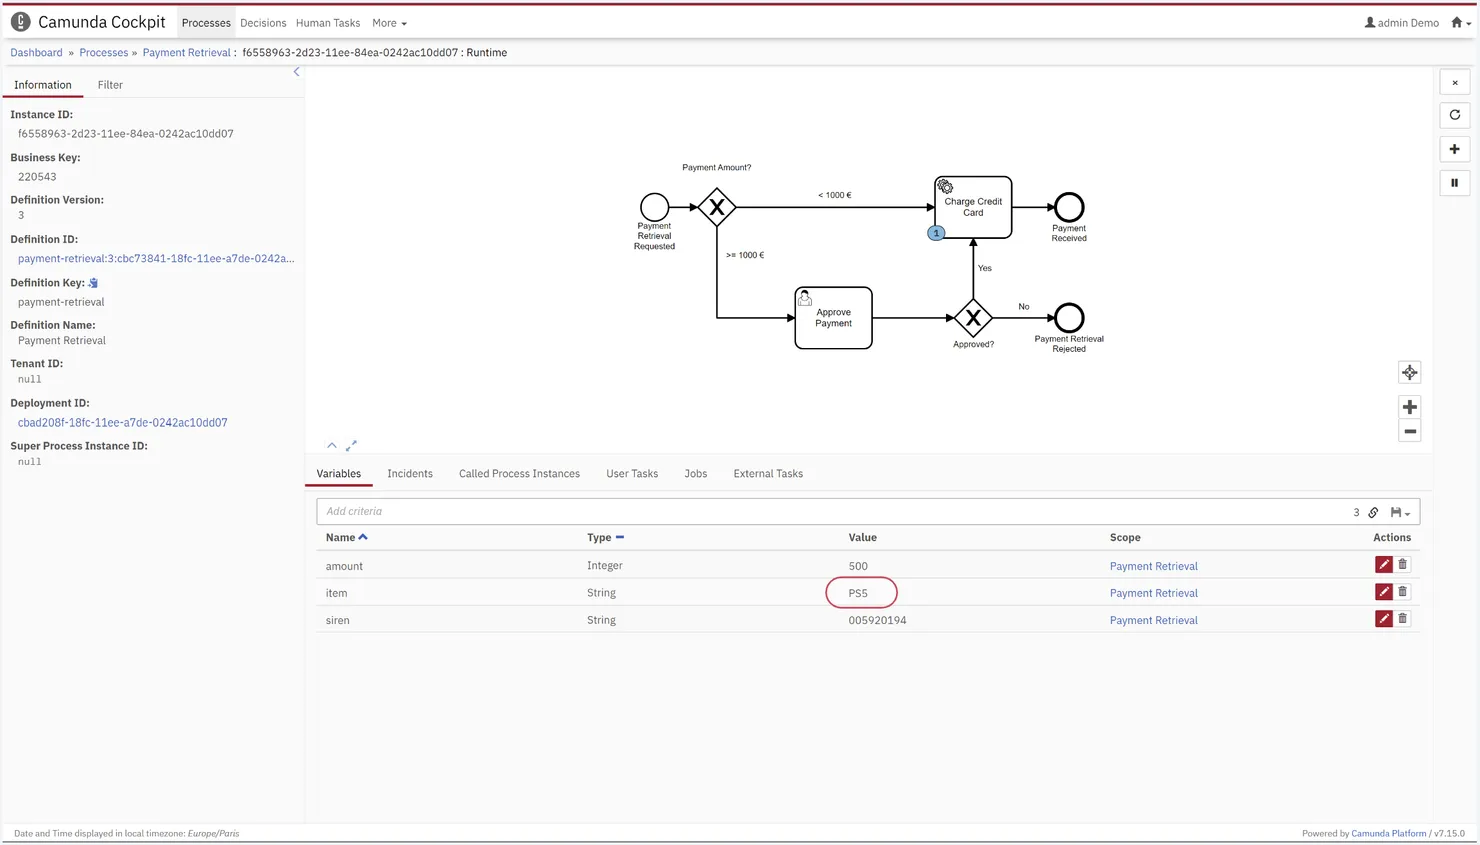
Afterward, it’s a Nintendo Switch.
Evolution of Camunda Workflows - Implementing a New Version (Versioning)
Please note that having multiple instances in different versions can be quite challenging to manage in Camunda because you can’t have an overview of all instances if they are in different versions through the graphical interface. You have to go from version to version to see where the instances of a version are located. Furthermore, the graphical interface doesn’t provide a summary of instances per version.
Therefore, when deploying a new version, it is strongly recommended to migrate the ongoing instances to the latest version to easily have an overview of your instances.
In this scenario, the intention is to adjust the threshold that triggers the payment’s routing to the “Approve Payment” activity. This threshold will be updated from €1000 to €2000. As a result, a new version of our process must be deployed to implement this change, necessitating a subsequent migration.
To migrate instances, there are two routes to be aware of. The route for generating the migration and the route for applying this migration:
-
The route POST
/migration/generateis used to generate the migration. There are two variables to include in the body. The sourceProcessDefinitionId, which is the processDefinitionId of the old version, and the target for the new version. You can find the processDefinitionId here: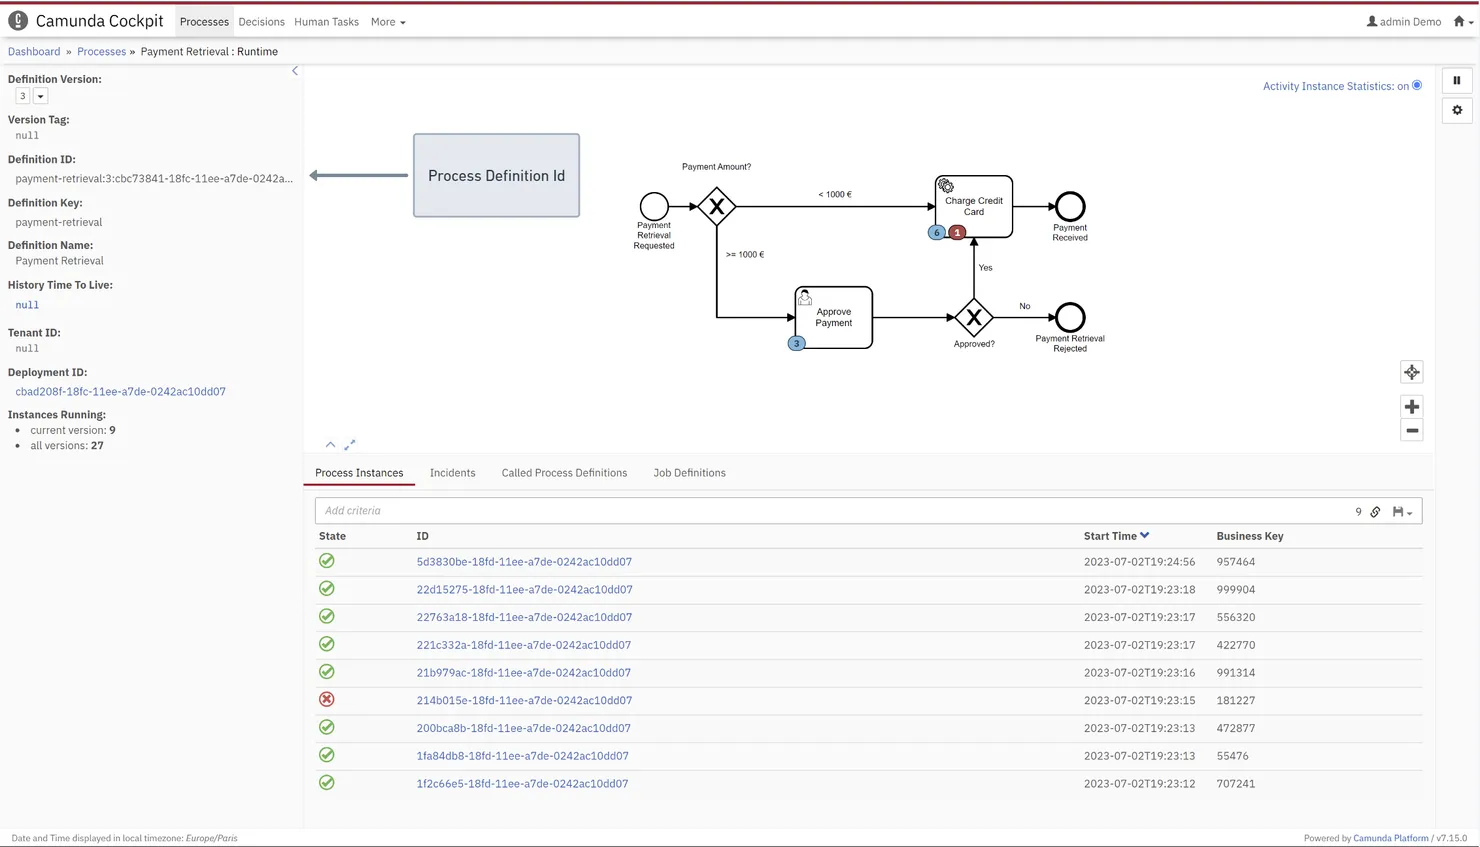
Here’s an example of the final body for the request:
{ "sourceProcessDefinitionId": "payment-retrieval:3:7782c450-09f5-11ee-8135-0242ac10dd09", "targetProcessDefinitionId": "payment-retrieval:4:9bbadebf-4b85-4656-8d2b-d40ac62a0296" } -
The route POST
/migration/executeis used to apply the migration. You have two options at your disposal. You can either migrate all instances or only specific instances.If you want to migrate specific instances from a version, you need two variables in the body:
- migrationPlan, which corresponds to the POST
/migration/generateresponse - processInstanceIds, which is the list of instance IDs you want to migrate
{
    {{migrationPlan}},
    "processInstanceIds": ["3521b7c0-3f00-4eb3-b47e-8c511d8fe03c", "44e5cfa4-8a06-4554-852a-0ad55a6b14bd"]
}
If you want to migrate all instances from a version, you need two variables in the body:
- migrationPlan, which corresponds to what was generated with the previous request
- processInstanceQuery, which is the process definition ID of the version where the instances to be migrated are located
{ {{migrationPlan}}, "processInstanceQuery": { "processDefinitionId": "payment-retrieval:1:7782c450-09f5-11ee-8135-0242ac10dd09" } } - migrationPlan, which corresponds to the POST
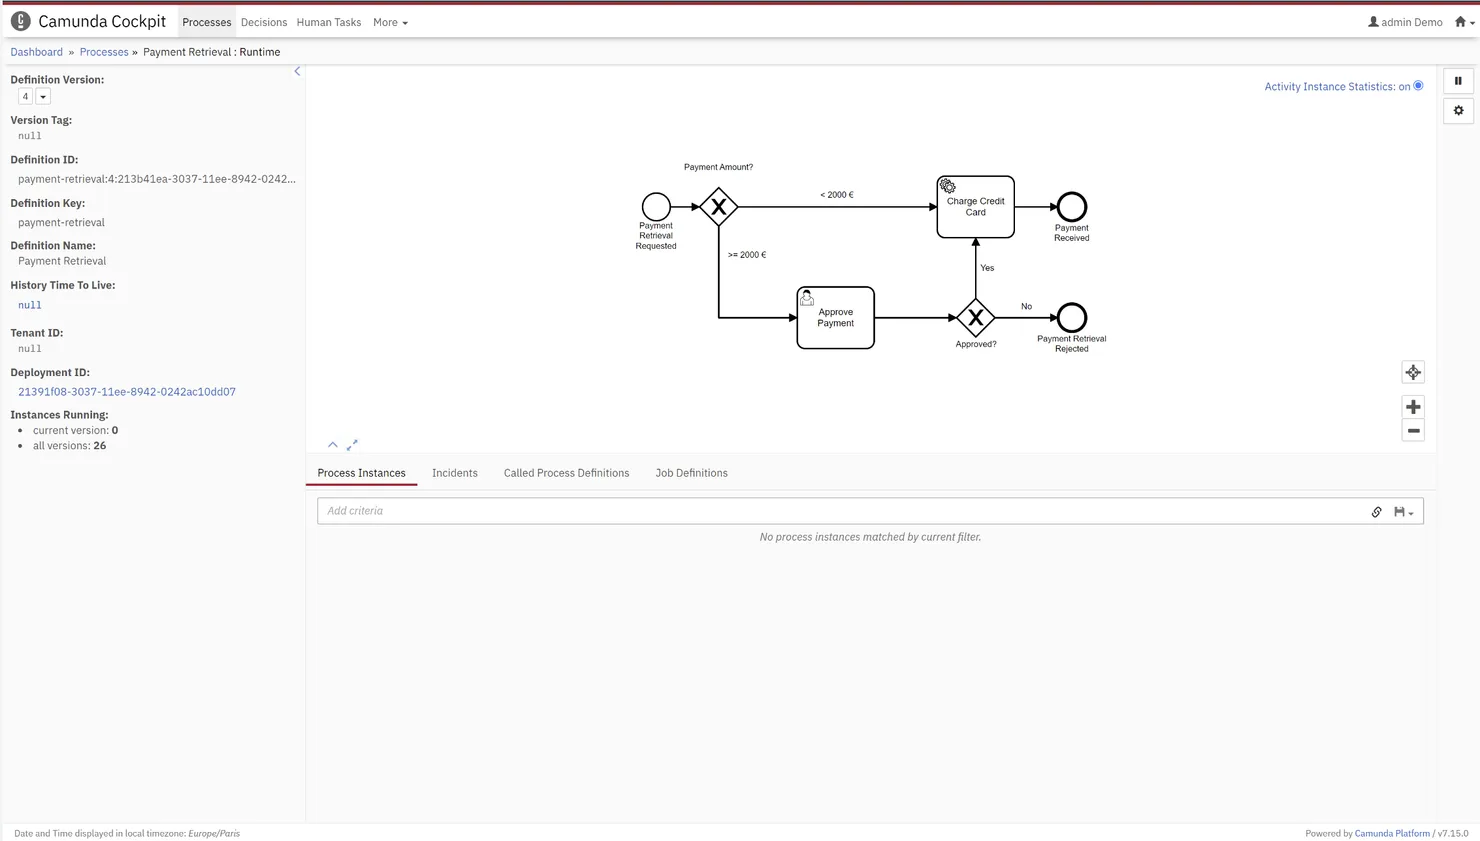
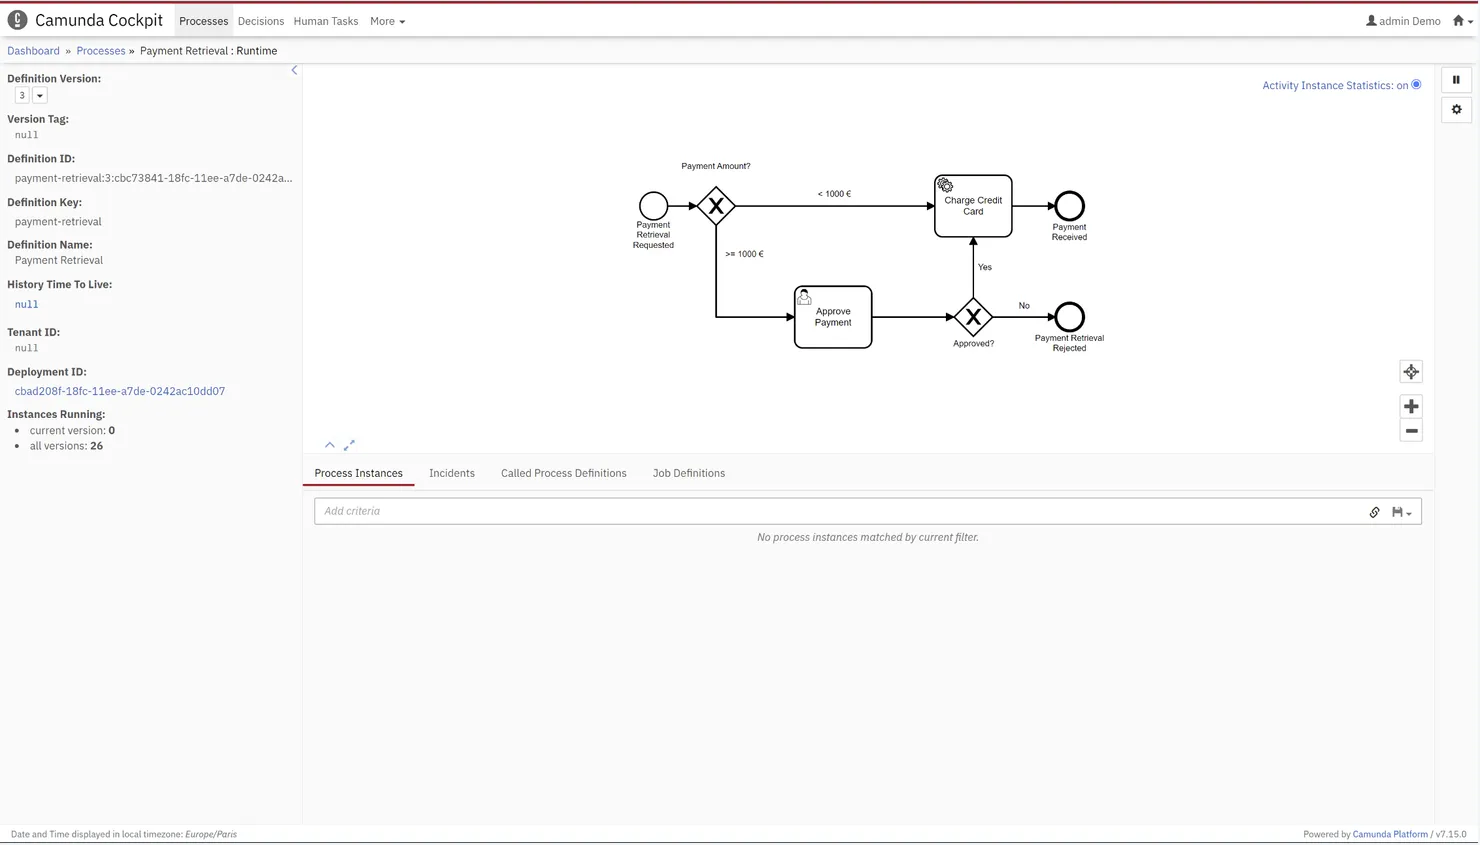
At the beginning of our migration, all our instances are in version 3 (as shown in the last image), and our version 4 does not yet have any instances.
Here’s an example of a migration plan generated with the first route:
{
  "sourceProcessDefinitionId": "payment-retrieval:3:cbc73841-18fc-11ee-a7de-0242ac10dd07",
  "targetProcessDefinitionId": "payment-retrieval:4:213b41ea-3037-11ee-8942-0242ac10dd07",
  "instructions": [
    {
      "sourceActivityIds": ["Task_ChargeCreditCard"],
      "targetActivityIds": ["Task_ChargeCreditCard"],
      "updateEventTrigger": false
    },
    {
      "sourceActivityIds": ["Task_ApprovePayment"],
      "targetActivityIds": ["Task_ApprovePayment"],
      "updateEventTrigger": false
    }
  ]
}
After applying our migration plan, all instances are now in version 4.
And there are no more instances in version 3.
Caution: Before any migration, it’s important to be cautious about any introduced breaking changes that could potentially cause instances to fail.
You can find more information about instance migration in the Camunda REST API documentation.
Debugging / Understanding Errors - Visualization of Processes in Error
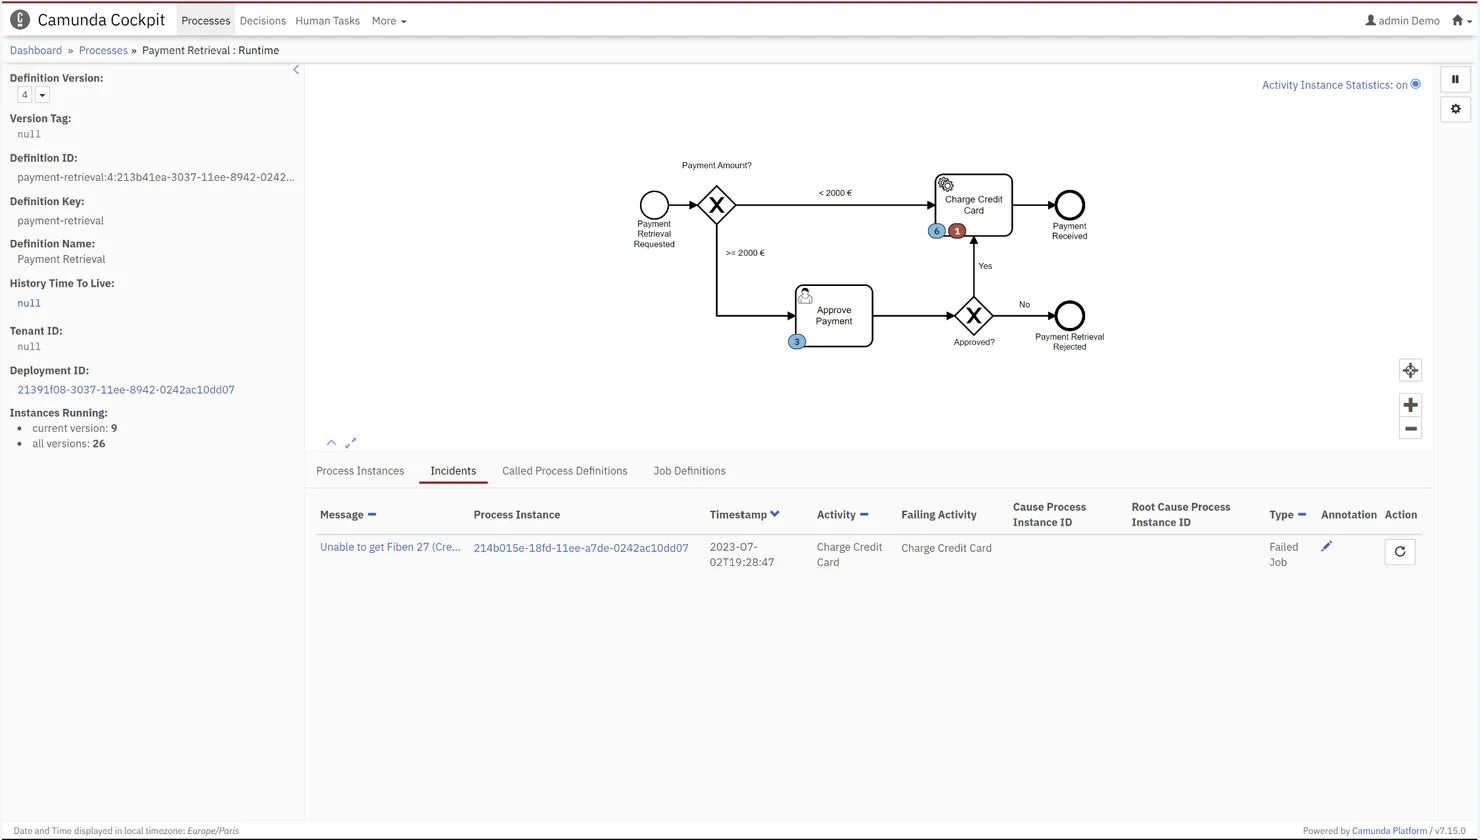
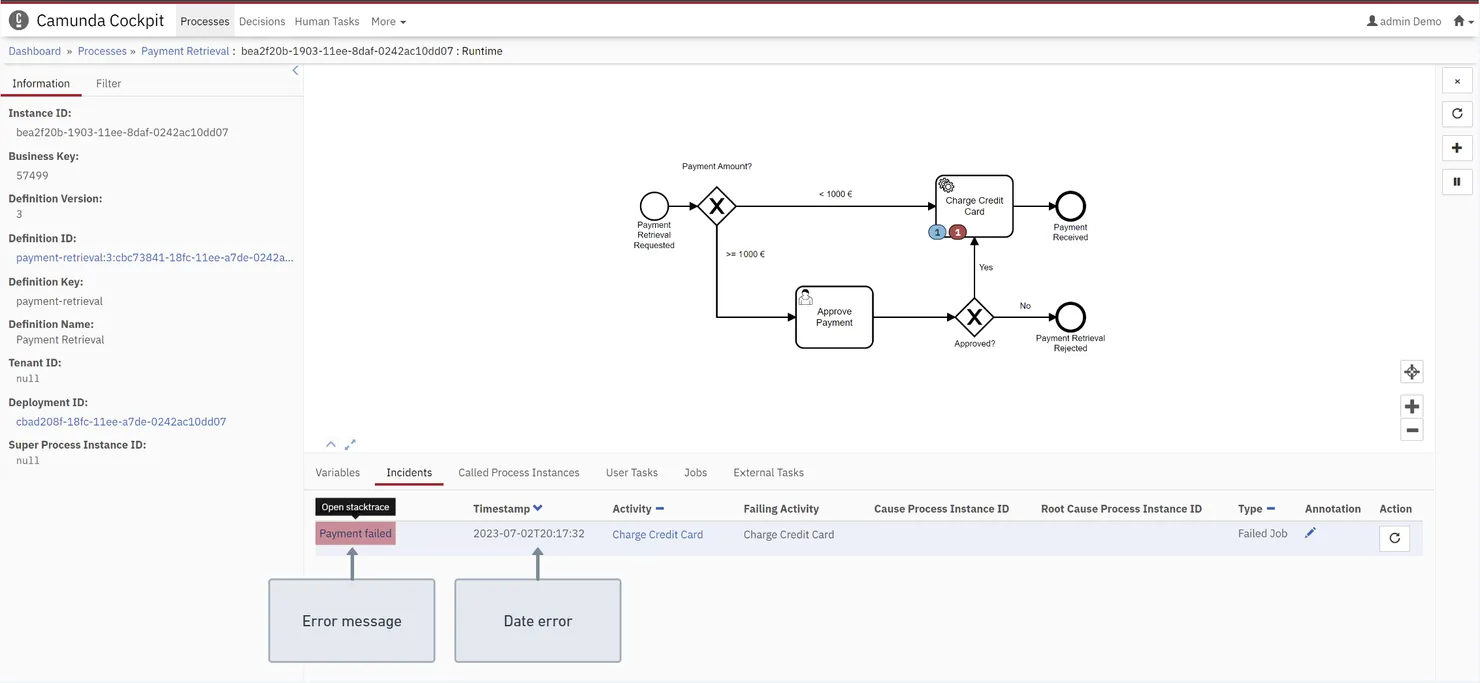
When there are multiple ongoing instances in Camunda, it’s crucial to easily identify if any of these instances are in error and require our attention. In the cockpit, it’s simple to identify them. The blue circle indicating the number of ongoing instances and the red circle signifies the number of instances in error among those in progress.
Furthermore, when an instance encounters an error, the cockpit provides us with valuable information through the “Incidents” tab:
- The date and time when the instance encountered the error can be accessed.
- In the message section, the stack trace of the activity that led to the instance failure can be accessed. This information is extremely helpful for understanding the reason behind the instance failure and for resolving the issue to prevent the instance from remaining stuck in the process.
I have just presented to you the main features of the Camunda cockpit as well as the most useful routes of Camunda’s API. If you need more information about the routes I’ve explained or if you want to discover other routes in Camunda, I invite you to refer to Camunda’s API REST documentation. This documentation should provide additional information about the features, parameters, and usage examples of different API routes. This could be particularly helpful for delving deeper into the capabilities offered by Camunda and for assisting you in the development and management of your business processes.

