Build a web3 SSO with MetaMask and Vendure
Simon Kpenou6 min read

Web3 ecommerce : simple MetaMask SSO on a Vendure backend
How to use a very popular crypto wallet as an identity provider to offer a simple, safe and well-known authentication method to crypto holders.

Removing the hurdle of creating an account greatly improves user experience when building e-commerce websites, which in turn improves conversion rates, meaning Single-Sign-On authentication is a good way to reduce friction.
It also improves data collection and allows businesses to build better customer profiles.
Let’s talk about a simple way to build a web3 SSO login that will allow you to reach out to new customers, maintain your authentication standards, and provide best-in-class UX.
The first thing we need is a custom authentication strategy. For this, we will use a fully customizable e-commerce backend.
On top of that, our process must be familiar to our users, and relatively easy to implement. Our goal is not to develop a new web3 protocol, so let’s use existing, popular web3 tools.
Finally, our solution must be safe. This is particularly important in web3 because the wallets our users will use to connect will sometimes contain very valuable assets. We will use dedicated web3 libraries that rely on asymmetric encryption to create and validate exchange connection information.
Our tools of choice used in this tutorial (100% fully typed, open source goodness)

Vendure: an API-first headless e-commerce framework that is quick to set up and fully customizable. It has connectors for the major front-end framework. Written over a NestJS core, it uses GraphQL and allows back-to-front typing.

MetaMask: a popular crypto wallet that will provide both reassurance and security to customers, while reducing friction on your side. It works as an app or as an extension on the user’s browser, and provides an API to interact with the blockchain and request authorizations from the user.

Wagmi: a front-end library that provides simple hooks to interact with MetaMask and handle the wallet’s state changes.

SIWE: a web3 protocol describing authentication through a standardized message signed with a user’s wallet’s private key. We will use it with MetaMask through a dedicated package.
How does it work?

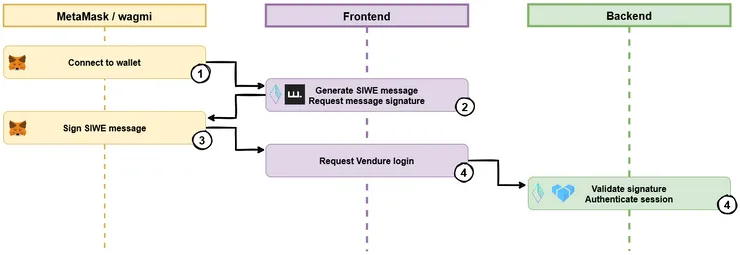
We will ask our users to prove they own a certain wallet by signing a message with their private key. Once we have that proof, we give the user access to the customer profile tied to the corresponding public key.
With the user’s wallet id, we generate a SIWE message, and sign it with the user’s private key.
On the backend, we can validate that signature, and extract the wallet id from the message data. If the signature is valid, the user has successfully logged in, and the session becomes authenticated. Finally, we use the wallet id as a user id to get or create the user’s profile.
Step by step:
Step 1: Set up the authentication
When the user opens the login panel, we use wagmi to ask the user to connect to their MetaMask wallet.
import { useConnect } from 'wagmi'
…
const { connect } = useConnect()
Step 2: Generate an authentication message
Once the wallet is connected, we use wagmi to get its public key.
import { useAccount } from 'wagmi'
…
const { address } = useAccount()
With that key, we generate an authentication message with SIWE.
import { SiweMessage } from "siwe";

interface CreateMessageArgs {
  walletId: string;
  chainId?: number;
}

const createMessage = ({ walletId, chainId }: CreateMessageArgs): string => {
  const message = new SiweMessage({
    domain: window.location.host,
    address: walletId,
    statement: "Sign in with Ethereum to the app.",
    uri: window.location.origin,
    version: "1",
    chainId,
  });

  return message.prepareMessage();
};
Step 3: Sign the message
Using wagmi, we sign the SIWE message with the user’s private key, and send it to the backend.
import { useSignMessage } from 'wagmi'
…
const { signMessageAsync } = useSignMessage()
…
const signature = await signMessageAsync({ message })
…
await login({
message,
walletId: address,
signature,
})
Step 4: validate the signature
On the backend, we validate the signature with SIWE.
import { SiweMessage } from 'siwe'
…
const message = new SiweMessage(data.message)
…
async verifyWeb2Signature(
ctx: RequestContext,
data: Web3AuthData
): Promise<boolean> {
const message = new SiweMessage(data.message)

// if the message is not valid, this will throw an error
await message.validate(data.signature)
return true
}
In Vendure, you can implement that logic in a custom authentication strategy, and pass that strategy to your Vendure config authOptions parameters. You can also add a custom field to link a customer profile to a wallet id.
Web3AuthenticationPlugin.ts
import { LanguageCode, PluginCommonModule, VendurePlugin } from "@vendure/core";
import gql from "graphql-tag";
import { Web3AuthenticationResolver } from "./Web3Authentication.resolver";
import { Web3AuthenticationService } from "./Web3Authentication.service";
import { Web3AuthenticationStrategy } from "./Web3AuthenticationStrategy";

@VendurePlugin({
  imports: [PluginCommonModule],
  configuration: (config) => {
    config.customFields.Customer.push({
      name: "publicWalletId",
      unique: true,
      label: [
        {
          languageCode: LanguageCode.en,
          value: "User Web 3 Public Wallet Id",
        },
      ],
      readonly: true,
      nullable: true,
      type: "string",
    });

    config.authOptions.shopAuthenticationStrategy.push(
      new Web3AuthenticationStrategy()
    );

    return config;
  },
  providers: [Web3AuthenticationService],
  shopApiExtensions: {
    schema: gql`
      extend type Mutation {
        generateNonce: String!
      }
    `,
    resolvers: [Web3AuthenticationResolver],
  },
})
export class Web3AuthenticationPlugin {}
Conclusion
With Vendure and MetaMask, setting up a web3 SSO is super easy! There is great support with fully typed libraries that make it easy to integrate web3 features.
Be careful though: like most web3 apps, MetaMask is still rapidly developing, and breaking changes can happen.
However, the system is easy to design and implement, and you can encapsulate MetaMask in a dedicated hook / context fairly easily.
Overall, this solution is secure, fast, and users are very familiar with it. Enjoy!
To go further
There is an important point I did not mention in this article: the N-once. An N-once is a cryptographically secure number that you can use to mitigate replay attacks.
By generating it on the backend at the start of the login procedure, and incorporating it into the siwe message, you can link that message to a given server session. If an attacker tries to use the signed message to impersonate the user on a different session, that session’s N-once will be different from the one in the signed message.
Please reach out if you have questions, if you see something that can be improved, or if you want to talk about web3 ! :)

Simon Kpenou
Software Engineer @ Theodo

