Web Single Sign-On, the SAML 2.0 perspective
Guillaume Klaus6 min read
What could be more annoying than one login page? To have several of them!
More and more on the web, people are allowed to connect to services through their Google, Facebook or other accounts. The user can then seamlessly connect to a set of services without creating a multitude of accounts.
One of the projects I worked on consisted of redesigning our client’s intranet. With other applications already in production, the SSO (single sign-on) was already in place across the company. Creating our own sign-on system was not an option, for several reasons:

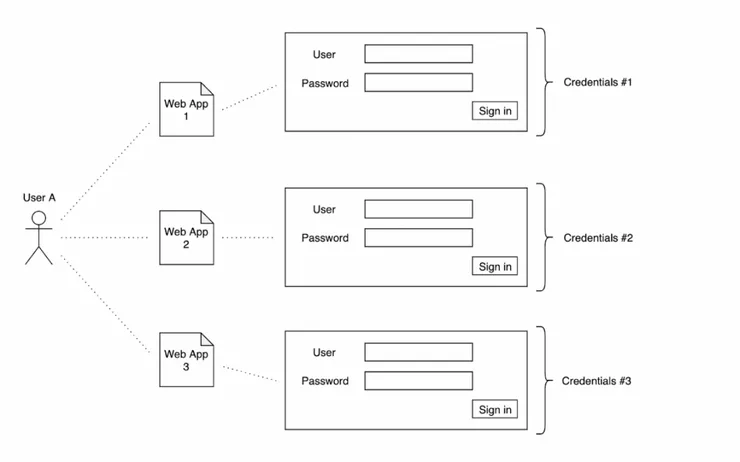
Without SSO situation
-
On the user side, you have to remember several login/password or (more frequently, but even worse) put the same one everywhere. The user path is interrupted by login operations that, despite being necessary, are quite cumbersome.
-
On the corporate side, managing multiple login systems makes it difficult to control access, increases the cost of maintaining these systems and increases help desk workload regarding lost password issues.

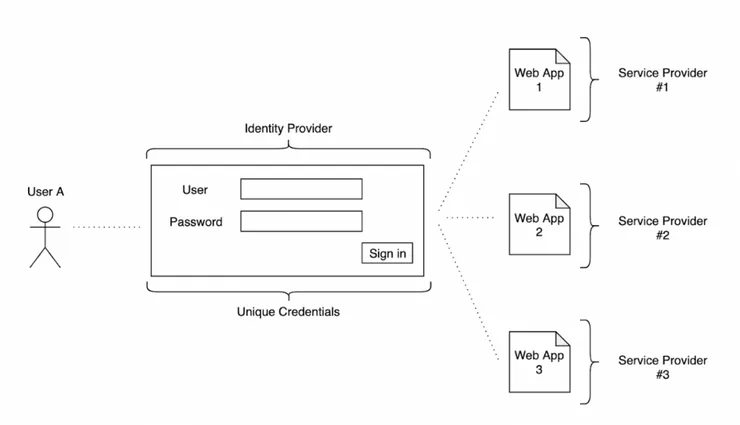
With SSO situation
Several protocols allow to implement a SSO system, but first of all it is good to distinguish two things: Authentication / Authorization.
Authentication is the process of certifying that users are who they claim to be, while Authorization is the process of determining what the user is allowed to do on the application, i.e. permissions.
To implement SSO, there are 3 main protocols:
Authentication
Authorization
SAML
✓
✓
OpenID
✓
✓
OAuth2
✓
How to choose?
- SAML works well with Active Directory and extensively used in corporate SSO systems.
- If the project is an API or a mobile application, OpenID is often preferred because it is easier to integrate.
- OpenID is becoming the standard for SSO for many companies today (Google, LinkedIn, GitHub).
- Unlike SAML, which uses XML files, OpenID is generally based on JWT (JSON format).
Even though older, SAML is still used a lot in companies and more complicated to set up than OpenID. In the following, we will see how this protocol works and the necessary steps to implement it.
What are the common points between SSO protocols?
In most common SSO protocols, two types of entities are distinguished.
- The Identity Provider (IdP), it stores and manages users and their permissions. It is responsible for granting other apps with authenticated and authorized user.
- The Service Provider (SP), the target application, the one you want to access, for example, the application of expense reports for a company.
SSO can be done in two ways:
- IdP initiated: the user goes to the IdP login page, enters his credentials, if he is a regular user he is now authenticated, he can go to the service provider.
- SP initiated: the user goes to the service provider (for example on the company’s expense reports application), if he has no active session, the SP redirects him to the IdP which will ask the user to connect, then the user will be redirected to the SP with a valid session.
In the following, we will look in depth at the SP initiated case, the mechanisms being similar in both cases.
How does SAML work in practice?
Let’s start from a concrete case. Imagine an employee who wants to go to the intranet of her or his company.

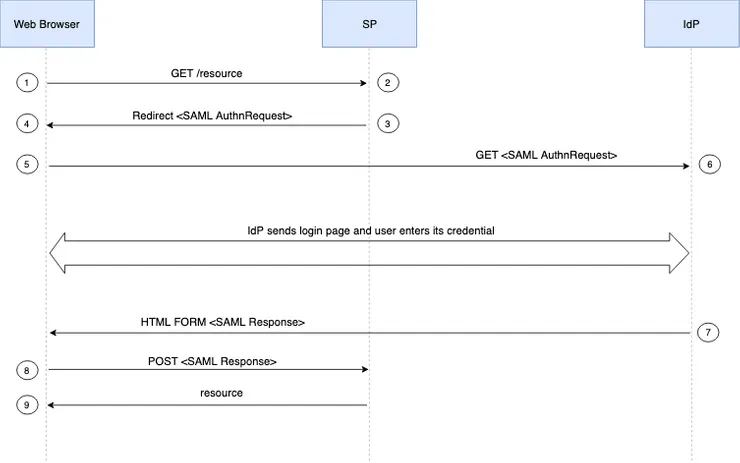
- The user wants to go to the intranet of her or his company, which will be our service provider example (SP). In most cases, this operation results in a GET request from the user’s browser to the Service Provider. This request is sent with any cookies associated with this domain.
- The Service Provider (SP) receives the request.
- If it contains cookies it checks if the information provided corresponds to an active session, if so the user is authenticated.
- Otherwise, the Service Provider uses a configuration file: the IdP Metadata file. This XML file contains, for example, the endpoint of the SSO on the IdP side, the public certificates associated with it and other IdP properties. - This information allows the creation of a SAML authentication request (AuthnRequest)
- Once created, this XML is url-encoded and returned to the user’s browser via a redirect request (302). This SAML request is added to the redirection URL, for example :
https://IDP.com/?
SAMLRequest=UrlEncodedBase64AuthnRequest - The browser follows the redirection address (containing in addition the SAML url-encoded request) through a GET request to the endpoint of the SSO.
- The IdP receives the request, eventually sent with a cookie corresponding to the IdP domain.
- If the information provided corresponds to an active session, the IdP returns a form containing the SAML Response to the user’s browser.
- If no cookie is present or if no session is active for the user, the IdP returns an authentication page for the user to enter his credentials. At the end of this process, if the user is authenticated, a session cookie associated with the IdP is stored in the browser. - The IdP generates an HTML form containing the SAMLResponse that it returns to the browser.
- The browser then makes a POST request containing this form to the service provider who reads the response and allows the connection based on the SAMLResponse.
- The user can access to its desired resource.
What do I need to set up SAML2 authentication?
- Do not try to generate SAML queries manually, there are libraries to do this, for example mellon for Apache.
- Configuring SAML2 requires a number of parameters that can be summarized as follows:
    "entityid" : "http://saml.example.com:saml/idp.xml",
    "service": {
        "idp": {
            "endpoints" : {
                "single_sign_on_service" : [
                        ("http://saml.example.com:saml:8088/sso",
                            BINDING_HTTP_REDIRECT)],
                "single_logout_service": [
                        ("http://saml.example.com:saml:8088/slo",
                            BINDING_HTTP_REDIRECT)]
            },
            ...
        }
    },
    "key_file" : "my.key",
    "cert_file" : "ca.pem",
- The entityid is the identifier of the entity : It is recommended that the entityid points to a real webpage where the metadata for the entity can be found.
- The different SSO and SLO (single log-out) endpoints associated with their bindings, i.e. the types of requests that the described endpoints recognize.
- A key_file : key_file is the name of a PEM formatted file that contains the private key of the service. This is used both to encrypt/sign assertions.
- A cert_file : This is the public part of the service private/public key pair. cert_file must be a PEM formatted certificate file.
After entering this information in the module configuration file or directly in the metadata file if it already exists, the authentication will have the minimum amount of information necessary to work.
We’ve arrived at the end of this article. If you followed through, you should have a better understanding of the way SAML works.
If you have any feedback or ideas on how to improve this article let me know by leaving a comment!

