iOS Development from Linux
Richard Miller7 min read

Unfortunately there’s no way* to develop an iOS app without a Mac.
Fortunately that doesn’t mean you need to switch to a Macbook, there is another way.
*No legal way.
You might find articles suggesting installing OS X (or macOS as it’s now branded) in a virtual machine, but this breaches Apple’s EULA and often involves downloading unverifiable versions from the internet. The section (2.B) also states that a business can allow multiple users to use the same Mac, so these instructions can be used for a whole development team.
Why?
I’m a Linux user. There are many reasons behind this but since this is a professional blog I won’t go into them; suffice to say I’d rather figure out the content of this post than switch to Mac.
I’ve been doing a lot of React Native development recently and while it runs Javascript internally, it uses native user interface components (rather than a webview), so you need to be able to compile the real app. Android can be built anywhere even Android but iOS is more fussy.
The techniques used here can also be used for any secure tunneling so even if you love the drag-to-install world you can benefit from them.
What?
I bought a Mac Mini, which now lives on my desk at home. I set up SSH to allow me to connect from anywhere and then tunneled VNC over it to allow for secure remote desktop connections. I have a copy of the iOS code on the Mac (which changes infrequently) which I can run in the simulator and through more tunneling it runs the javascript directly from my laptop.
Confused?
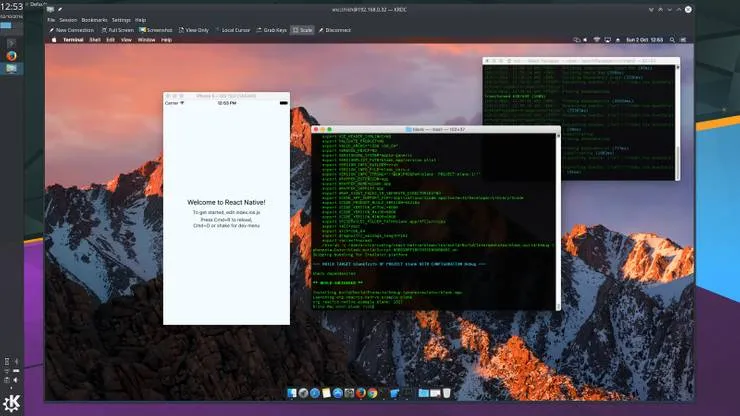
I’ll go into it. But in the end, the result looks something like the screenshot at the top of the page.
How?
I’m glad you asked:
Unpacking the Box (Setting Up SSH)
On the Mac (you’ll need a display for this), open System Preferences, go to ‘Sharing’ and enable Remote Login and Screen Sharing. The Remote Login page will helpfully tell you your local IP to connect to from your development machine, use this to copy over your ssh public key. If you don’t already have a key, use the ssh-keygen command and follow the prompts to create one. The easiest way to get your key over is:
# On your development machine
$ cat ~/.ssh/id_rsa.pub
# Select the output and copy
$ ssh user@192.168.X.Y
$ nano ~/.ssh/authorized_keys
# paste in contents of your public key then ctrl-x to exit
For security, on the Mac you want to disable password authentication, so open the file /etc/ssh/sshd_config and add the following lines. You’ll need to restart ssh for them to take effect, the easiest ways being disable and re-enable remote access or reboot:
PasswordAuthentication no
PermitEmptyPasswords no
ChallengeResponseAuthentication no
If you’re feeling really paranoid you can also lock down the firewall as long as sshd-keygen-wrapper can accept connections.
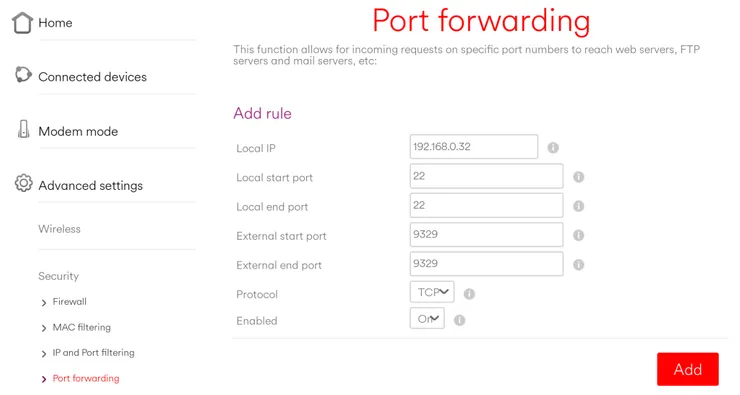
The last step is to set up port forwarding through your home router. I can’t tell you how to do this as it depends on what router you have. You’ll need to go to the configuration page by going to its IP address in a web browser (normally 192.168.0.1 or 192.168.1.1), it’ll probably be in advanced settings somewhere under port forwarding. What you want to set up is a forward of TCP traffic from a random high numbered port (e.g. 9329) on the public side to port 22 on your Mac. The default port for ssh is 22 (and macOS seems to ignore attempts to change the config) but moving it to another port externally means that anyone trying to connect to random IPs won’t find it. Mine looks like this:

Wiring It All Up (SSH Port Forwarding)
Now for the interesting part, which is also generally useful for port forwarding, so feel free to replace ‘Mac’ with any remote machine you want to play with. We’re going to set up an ssh configuration which will allow you to reuse your settings without having to remember the whole command. You can do the same without a config and I’ll give you that too.
The main concepts here are ‘local’ and ‘remote’ forwards. Simply put, SSH binds to a port on one side, this prevents any other processes from binding to that port, but allows it to accept connections. When anything tries to connect to the port it forwards that request to the other port on the other machine, so it goes to whatever is bound to the other port.
For example VNC will be bound to port 5900 on the Mac, waiting for a remote machine to connect. We want SSH to bind to a port on our development machine and forward any connections to the Mac on port 5900. This is called a ‘local’ forward as the bound port is local.
In my example I’ll be setting up for React Native development, so I want to run services like the packager locally. It’ll transpile the Javascript and send it to the device when running in development mode, allowing for hot reloading and other such goodies. It’ll be bound to port 8081 by default, and when I run the app on the Mac it’ll try to connect to 8081, so I want SSH to be bound to the remote port 8081 and forward the connections to local port 8081. You might have guessed this is called a ‘remote’ forward.
For this step you’ll need the public IP of your Mac’s location. The answer to this (and to many other questions) can be discovered by visiting this link from your Mac. Unless you’ve paid for a static IP, it will change, but for me this hasn’t happened more than every few months. I don’t have a good solution to this yet other than changing your config whenever it changes (but try the link I just gave). On your dev machine open a file at ~/.ssh/config and add the following (indentation is important):
Host mac-mini-vnc
  Hostname <your home network's public IP here>
  Port <your public ssh port here>
  User <username on Mac>
  # VNC
  LocalForward 5900 127.0.0.1:5900
  # React Native packager
  RemoteForward 8081 127.0.0.1:8081
  # Redux remote debugger
  RemoteForward 8000 127.0.0.1:8000
  # Default port for node.js, so my development backend
  RemoteForward 3000 127.0.0.1:3000
You can activate all this by running ssh mac-mini-vnc, optionally adding the -N or -f options to not open a remote terminal and to run in the background respectively. If you want to run the above without a config (with the -fN), the command is:
ssh -fN -p <port> -L 5900:127.0.0.1:5900 -R 8081:127.0.0.1:8081 -R 8000:127.0.0.1:8000 -R 3000:127.0.0.1:3000 <user>@<IP address>
Which is why I use a config file.
Starting It Up
Now you should be able to open a VNC client on your development machine (I use KRDC) and connect it to <user>@localhost:5900. You’ll need to put in the username and password for your Mac and you should see your desktop. I needed to turn down the screen resolution on the Mac to improve the responsiveness, unfortunately this can only be done while the real screen is on.
You need to have the iOS part of the app built and run on the Mac so you’ll need to follow the instructions for setting up React Native iOS development. Once you’re done clone your project and npm install the dependencies as these can include native parts. You’ll also want to have the project set up on your development machine, and start the packager with react-native start. Now you can finally run the project on the Mac by running react-native run-ios, this will build the app and deploy it to the iOS simulator.
You’ll still need to set up Redux and a back-end server to make use of the other routes, but for now you can enjoy the fun of React Native by making a change on your development machine, go to the VNC window, hit meta-r (cmd-r to the mac, it’ll most likely be a windows-r on your machine), and see the changes.
Final Thoughts
So there you go, iOS app development from a Linux machine. Admittedly it requires buying a Mac, but you don’t need to change your normal operating system or buy an overpriced Macbook (Mac Minis start at £400/550€). It might not be as easy as doing it from a Mac, but you’re probably not using Linux because it’s easy.

